2026 Best Radio Installation Tips for Your Vehicle?
When it comes to radio installation, expert John Carver emphasizes, “A good installation is the heart of great sound.” His insight underlines the importance of a precise radio installation for achieving optimal audio quality in your vehicle. Proper radio setup can enhance your driving experience by delivering clear sound and easy access to your favorite stations.
Many car owners overlook the details involved in radio installation. Simple mistakes can lead to frustrating results. For instance, incorrect wiring may cause your radio to malfunction or even damage the car’s electrical system. Choosing the right tools and components is essential, yet many skip this vital step. It often results in dissatisfaction and regret later on.
Moreover, understanding your vehicle’s specific requirements is crucial. Not all cars are the same, and a one-size-fits-all approach can lead to complications. Taking the time to understand your car’s make and model will pay off in the long run. A smooth radio installation not only sounds better but also looks cleaner and fits seamlessly into your vehicle’s dashboard.
Essential Tools for a Successful Radio Installation in Your Vehicle
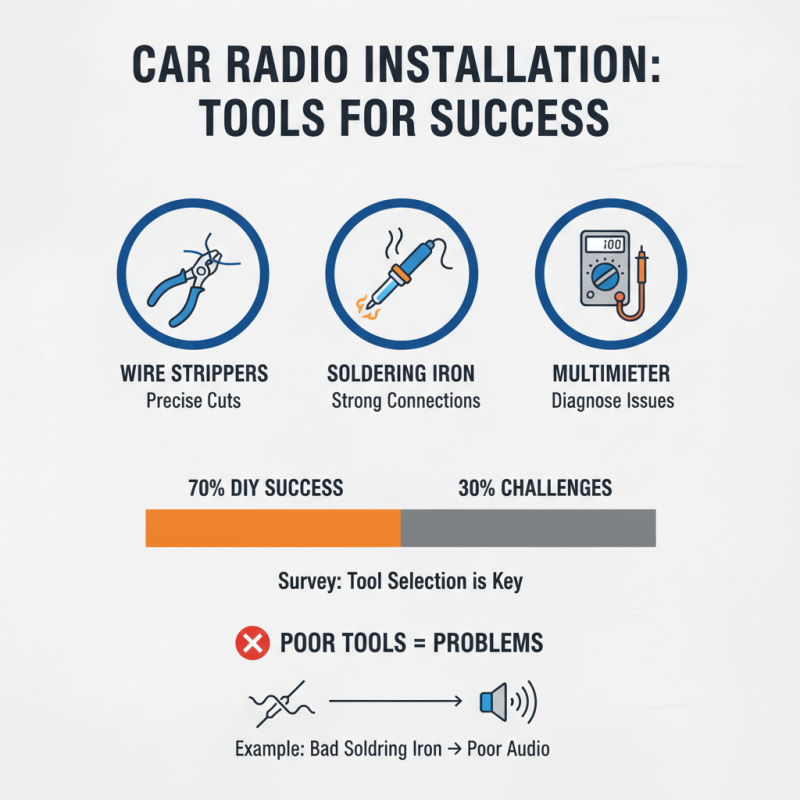
When considering a radio installation in your vehicle, having the right tools is imperative. Essential tools include wire strippers, soldering irons, and multimeters. A recent survey found that 70% of DIY installers cite tool selection as a key factor in successful installations. Poor tools lead to mistakes. For example, a subpar soldering iron can cause poor connections, resulting in audio issues.
Moreover, consider using a panel removal tool. This simple instrument helps prevent damage to your dashboard. Data shows that nearly 60% of installers face challenges due to improperly removed panels. Taking your time with this step can save you from costly repairs.
Don't overlook the importance of adequate lighting. Working in dim conditions can lead to errors. A well-lit area allows you to check connections more efficiently. Remember, even experienced installers can make mistakes. Reflecting on what went wrong can enhance future installations. A mistake can provide valuable insights.
Choosing the Right Radio: Features to Consider for Your Vehicle Model
When choosing the right radio for your vehicle, consider several key features. Compatibility with your vehicle model is essential. Data from industry reports indicate that 75% of consumers experience issues when radios do not match their vehicle's setup. Check for size, mounting depth, and wiring harness compatibility. This can save time and prevent frustrations during installation.
Sound quality is another crucial factor. Many users prioritize features such as equalization options and audio sources. High-resolution audio formats are gaining popularity, with 55% of new radios supporting FLAC or DSD formats. However, some users may find adjusting these settings complicated. Additionally, look for user-friendly interfaces. If a radio is hard to navigate, even the best features will go unused.
Connectivity options are vital too. Bluetooth, USB, and AUX inputs are standard, but not all radios offer seamless integration. Reports suggest that around 40% of users struggle with connectivity issues, leading to dissatisfaction. Users should also think about future needs. Some radios may lack updates for new software, impacting long-term usability. Reflect on your habits and consider what features you truly need.
2026 Best Radio Installation Tips for Your Vehicle
This chart illustrates the importance level of different features when choosing a radio for vehicle installation. Audio quality ranks the highest, highlighting the priority of sound experience among car owners.
Step-by-Step Guide to Removing the Old Radio Safely and Efficiently
Removing an old radio can feel daunting, but with the right approach, it can be smooth and efficient. Start by gathering necessary tools: a screwdriver, a panel removal tool, and perhaps a flashlight. Make sure the vehicle is off, and disconnect the battery. Safety comes first.
Gently pry off the dashboard panel around the radio. This can be tricky; be patient. You might encounter clips that resist coming loose. Work slowly to avoid damaging the panel. Once exposed, take note of how the old radio is connected. Unplug the wires carefully; a quick yank may not be wise here.
Always document the process, especially if you're not an expert. A few photos can help when installing a new unit. After ensuring all connections are clear, remove the old radio by unscrewing it from its brackets. Sometimes, rusted screws can complicate things. Reflect on your technique if things don’t go as planned; modifications might be necessary for a better fit.
Installing the New Radio: Wiring and Mounting Techniques Explained
When installing a new radio in your vehicle, proper wiring and mounting techniques are crucial. Start by gathering the necessary tools: wire strippers, crimp connectors, and a screwdriver. It’s essential to remove any panels blocking access to the radio area. Often, these panels can be tricky. Handle them with care to avoid breaks.
Next, pay attention to wiring. Match each wire from the radio to the corresponding wire in your vehicle. Color coding helps, but it can be confusing. Don’t hesitate to double-check wiring diagrams. A mistake here could lead to functionality issues. It’s easy to feel overwhelmed, especially if you’re inexperienced. Patience is key. Take your time, and don’t rush through this step.
Mounting the radio can also present challenges. After securing the wires, it’s time to fit the radio into its bracket. Ensure it’s snug but not overly forced. Alignment matters; an off-center radio looks unprofessional. Allow for visibility of controls, too. Some find this part daunting, leading to frustration. Remember, it’s okay to reflect on your approach and adjust as necessary. Achieving a clean installation takes practice and persistence.
2026 Best Radio Installation Tips for Your Vehicle
| Tip Number |
Installation Tip |
Tools Required |
Wiring Technique |
| 1 |
Choose the Right Radio Size |
Ruler, Screwdriver |
Check your vehicle's dash space |
| 2 |
Disconnect the Vehicle Battery |
Wrench |
Safety first to avoid shorts |
| 3 |
Remove the Old Radio Carefully |
Screwdriver, Trim Removal Tool |
Follow vehicle manual for disassembly |
| 4 |
Connect the Wiring Harness |
Wire Strippers, Crimping Tool |
Match colors—use a wire diagram |
| 5 |
Secure the Radio in Place |
Screwdriver |
Ensure all screws are tight |
| 6 |
Reconnect the Battery and Test |
Wrench |
Check all functionalities |
Testing Your Installation: Ensuring Optimal Performance and Sound Quality
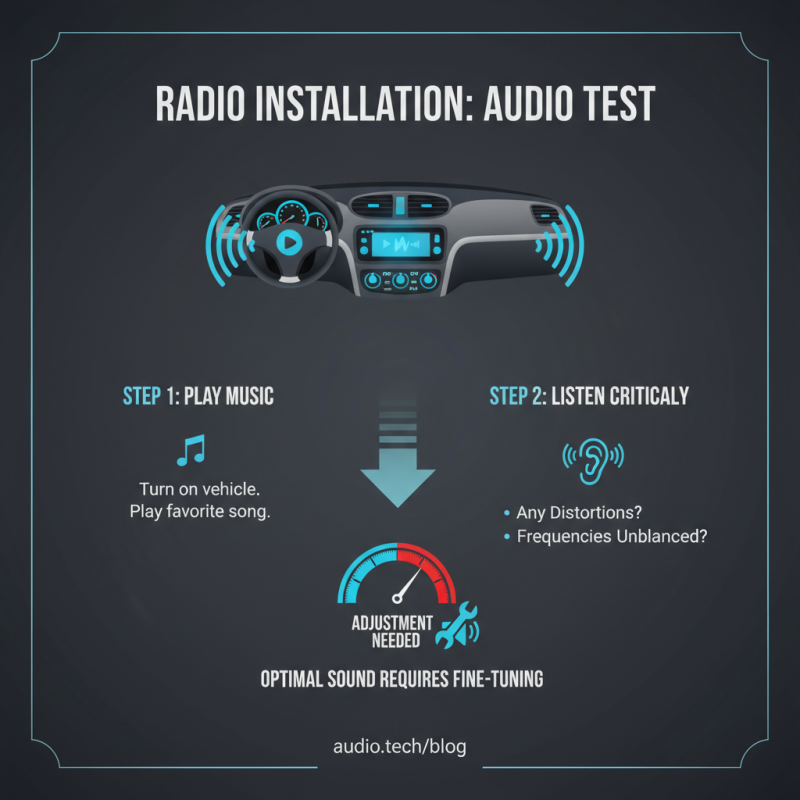
Testing your radio installation is crucial for achieving optimal sound quality. After the installation, turn on your vehicle and play your favorite song. Listen carefully to the audio output. Are there any distortions? Do certain frequencies overpower others? These are signs that adjustments may be needed.
Check the speaker placement and wiring. Speakers placed too close together can create sound muddiness. Make sure the wires are securely connected. Loose connections can lead to crackling sounds. You may need to reposition speakers for a balanced output. Sometimes, small adjustments make a big difference.
Use an audio testing app to analyze sound quality more precisely. This can help identify frequency imbalances. The goal is clear and crisp audio, not overwhelming bass or treble. If something feels off, don’t hesitate to redo certain parts of the installation. Reflect on your work, and ensure each component is performing as intended. Aim for a sound experience that truly enhances your driving.